
Armor Crypto
The MCP server for interacting with Blockchain, Swaps, Strategic Planning and more.
Installation
Installing for Claude Desktop
Option 1: One-Command Installation
npx mcpbar@latest install armorwallet/armor-crypto-mcp -c claudeThis command will automatically install and configure the Armor Crypto MCP server for your selected client.
Option 2: Manual Configuration
Run the command below to open your configuration file:
npx mcpbar@latest edit -c claudeAfter opening your configuration file, copy and paste this configuration:
View JSON configuration
{
  "mcpServers": {
    "Armor Crypto": {
      "command": "uvx",
      "args": [
        "armor-crypto-mcp@latest",
        "--version"
      ],
      "env": {
        "ARMOR_API_KEY": "<PUT-YOUR-KEY-HERE>"
      }
    }
  }
}Armor Crypto MCP
Alpha Test version 0.1.24
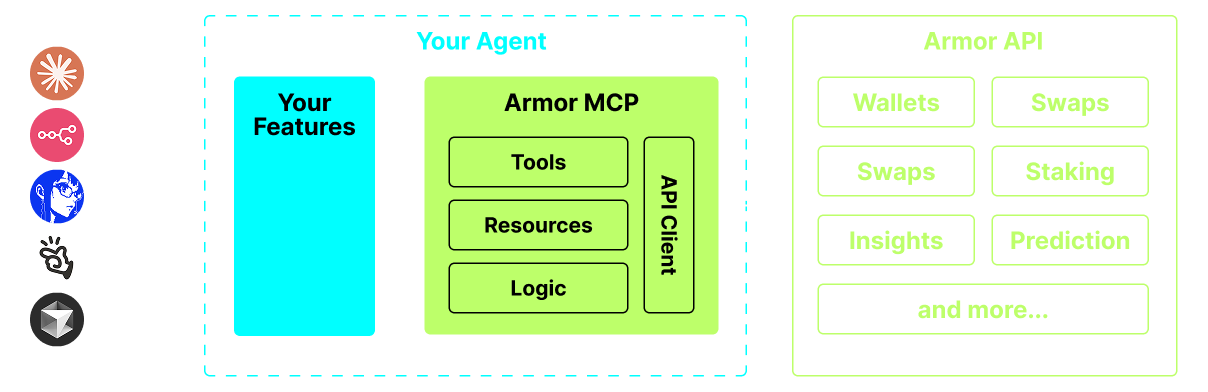
A single source for integrating AI Agents with the Crypto ecosystem. This includes Wallet creation and management, swaps, transfers, event-based trades like DCA, stop loss and take profit, and much more. The Armor MCP supports Solana in Alpha and, when in beta, will support more than a dozen blockchains, including Ethereum. Base, Avalanche, Bitcoin, Sui, Berachain, megaETH, Optimism, Ton, BNB, and Arbitrum, among others. Using Armor's MCP you can bring all of crypto into your AI Agent with unified logic and a complete set of tools.
Features
🧠 AI Native
📙 Wallet Management
🔃 Swaps
🌈 Specialized trades (DCA, Stop Loss etc.)
⛓️ Multi-chain
↔️ Cross-chain transations
🥩 Staking
🤖 Fast intergration to Agentic frameworks
👫 Social Sentiment
🔮 Prediction
Requirements
1. Make sure you have python installed
2. Install uv
Linux / Windows
pip install uv
Mac
brew install uv
3. Claude Desktop or your AI Agent will run the MCP
See Usage & Configuration for details.
Alpha Testing
We are currently in pre-alpha, and we are testing the capabilities of various agents and agentic frameworks like Claude Desktop, Cline, Cursor, n8n, etc.
Current Features & Tools
- Wallet Management
- Grouping & Organization
- Archiving
- Swap & Trades
- Normal swap
- DCA (place / list / cancel)
- Scheduled Orders
- Limit Orders (place / list / cancel)
- Staking and Unstaking
- Token Search and Trending Tokens
- Statistical Calculator for accurate Analysis
- Supports Solana blockchain
Coming Soon
- More Blockchain Support
- Minting
- Armor Agents as a Tool (or A2A)
MCP Setup
Currently you need to have the Armor NFT to get an API Key. Get it here
Usage & Configuration
To use the Armor MCP with your agent, you need the following configuration, replace <PUT-YOUR-KEY-HERE> with your API key:
{
  "mcpServers": {
    "armor-crypto-mcp": {
      "command": "uvx",
      "args": ["armor-crypto-mcp@latest", "--version"],
      "env": {
        "ARMOR_API_KEY": "<PUT-YOUR-KEY-HERE>"
      }
    }
  }
}
Use in Claude Desktop
- Must have Developer Mode enabled
- Open Claude Desktop's File Menu top left of the window.
- Go to File > Settings
- Under Developer, click Edit Configuration
- In the config file, insert the
armor-wallet-mcpsection from above - Make sure to replace the placeholder with your API key
- Save the file and start a new Chat in Claude Desktop
Use in Cline
- Click on the
MCP Serversbutton in the Cline tab in VSCode on the left panel - Scroll to the bottom of the left panel and click on
Configure MCP Servers - In the config file, insert
armor-wallet-mcpsection from above - Make sure to replace the placeholder with your API key
- Save the file, click
Doneunder theMCP Serverstab and start chatting with Cline
Use in n8n
- Open the n8n app
- Bottom-left of screen click
...next to your username and clickSettings - On the left panel, click
Community nodesand thenInstall a Community Nodebutton - In the search field for
npm Package Nametype in mcp - Install
MCP Nodes - Add any MCP node, for example:
List Tools - In the MCP Client
Parameterstab, clickSelect Credentialand clickCreate new credential - Under
Commandenteruvx - Under
Argumentsenterarmor-crypto-mcp - Under
EnvironmentsenterARMOR_API_KEY=eyJhbGciOiJIUzI1NiIsIn...paste the full API Key value after the= - Back in the
Parameterstab you can choose the MCPOperationfor that Node
Using Armor MCP
Once you have setup the Armor MCP here are some prompts you can use to get started
Stars
162Forks
29Last commit
6 months agoRepository age
8 monthsLicense
GPL-3.0
Auto-fetched from GitHub .
MCP servers similar to Armor Crypto:

Stars
Forks
Last commit
Stars
Forks
Last commit
Stars
Forks
Last commit